STUDENT WORK

All Projects
Circuits
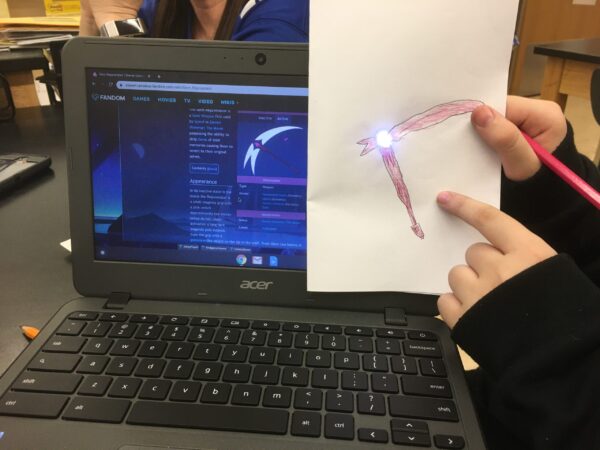
Using a Fandom wiki page for artistic inspiration, a middle-school student recreates the Gem Rejuvenator, a magical weapon from a favorite movie called Steven Universe.
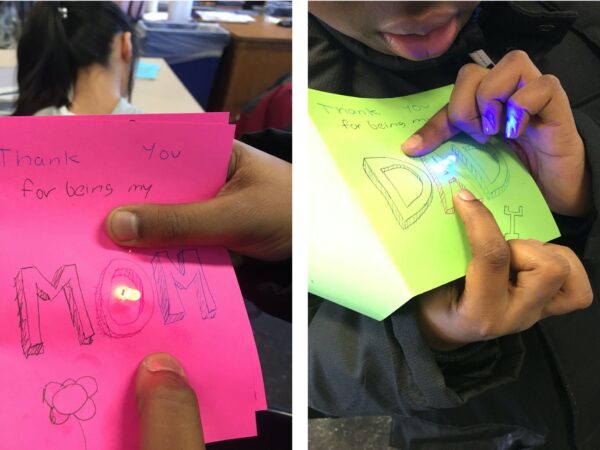
Creating light up drawings and cards is an approachable, fun, and creative way to apply paper circuit making skills. A sketch was drawn, a simple circuit was designed and tested, and voila, a holiday card springs to life.
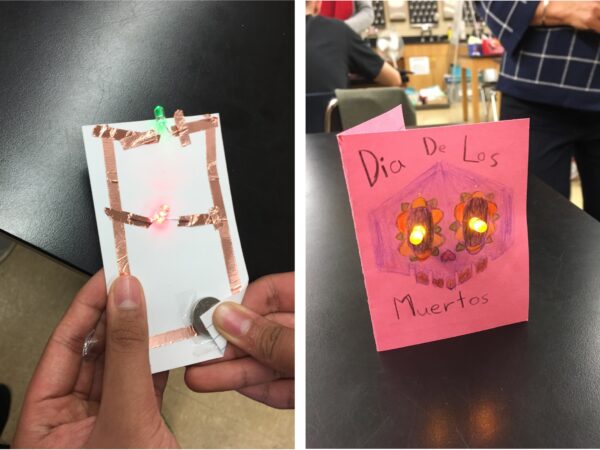
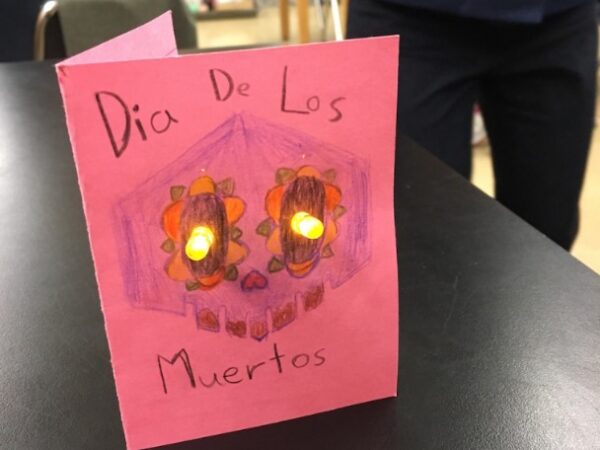
Once makers get the hang of making a simple circuit with 1 LED, they often want to experiment with figuring out how to get multiple LEDs to light up. And once they do, a door opens for making more elaborate creations.
Using a Fandom wiki page for artistic inspiration, a middle-school student recreates the Gem Rejuvenator, a magical weapon from a favorite movie called Steven Universe.
A final project from the world-building curriculum, LEDs light the sign that draw us in to the fantastical world of a cave filled glowing crystals.
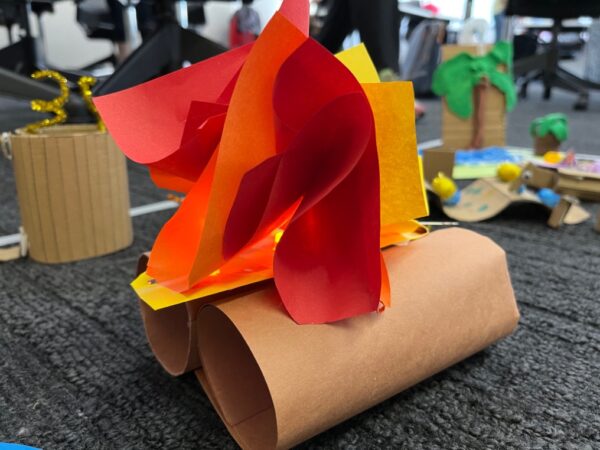
Made by a teacher during a World-building curriculum training, a paper circuit with a yellow LED was integrated into a bonfire that sat on the beach of an ideal “day off” world.
3D Printing

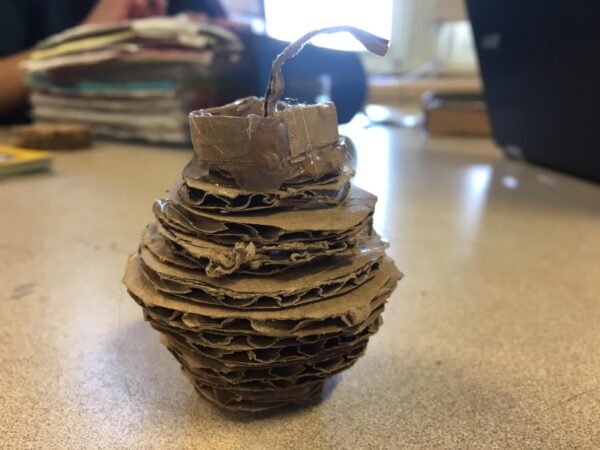
Making a layered Play-Doh creation, and then trying to recreate it out of hot glue, is more challenging than one would think. The goal of this kinesthetic activity, regardless of the degree of “success” of the glue version, is to help students internalize the concept that 3D objects are replicated by a printer by layering melted filament in the code that comes from a digital design.
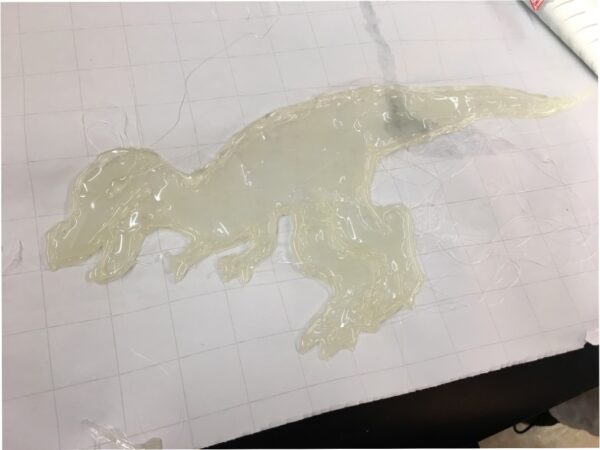
A T-rex made out of hot glue. Who would have thought? Students allow each layer to dry a bit before applying the next one.
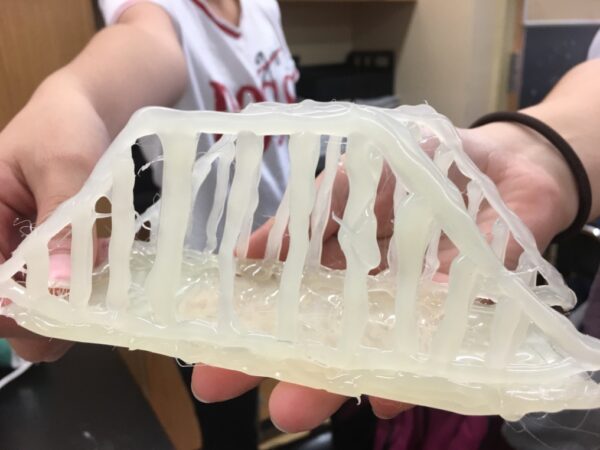
The base and the 2 sides of this complex hot glue layering project were made individually and then assembled.
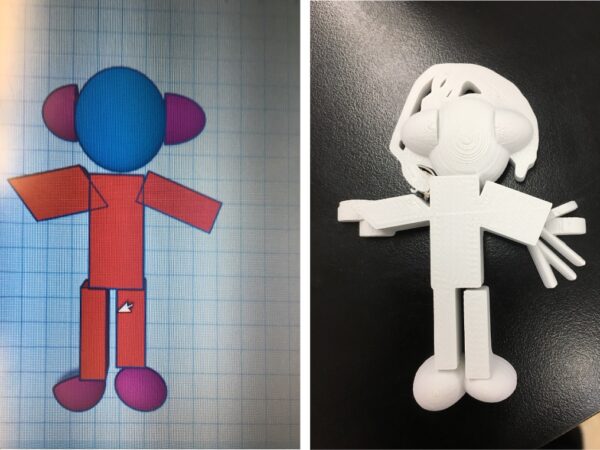
Not sure where to start? Go back to the basics and imagine the individual shapes that make up a figure or object. The maker found success by doing just that and discovering along the way that a figure’s leg can attach to a body by connecting the feet.
Design once, print twice. And who says you need to change filament? Paint goes a long way and simplifies the production process.
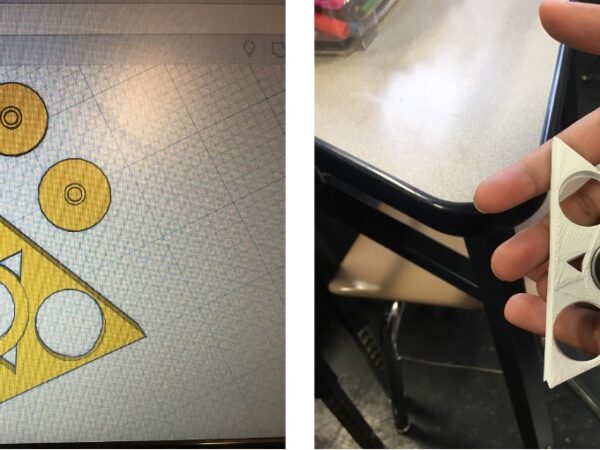
3D design and printing gives makers a way to create that new object for themselves or others. Sometimes you just need a fidget spinner!
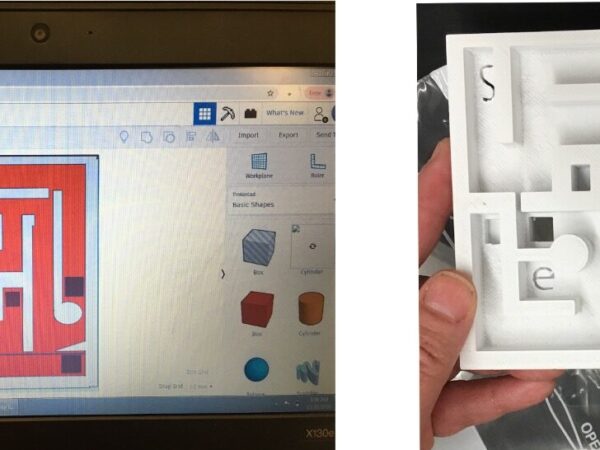
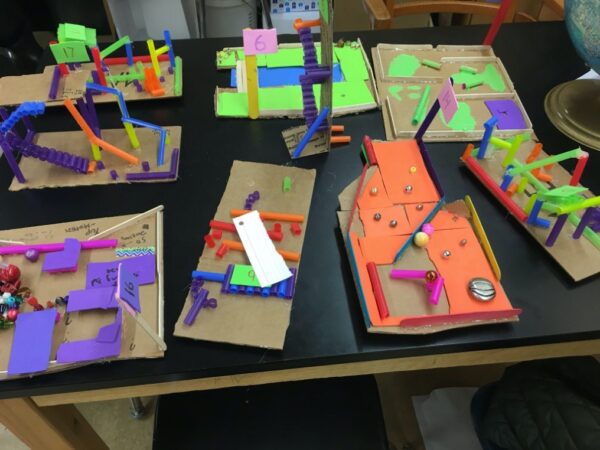
To design a marble maze, this maker had to design for positive and negative space, for scale, and consider the most practical of details as they designed the digital file, like How big should a handheld game be? How big should the marble be? How high should the perimeter wall be to “contain” the marble? How wide do the paths need to be for a marble to move?
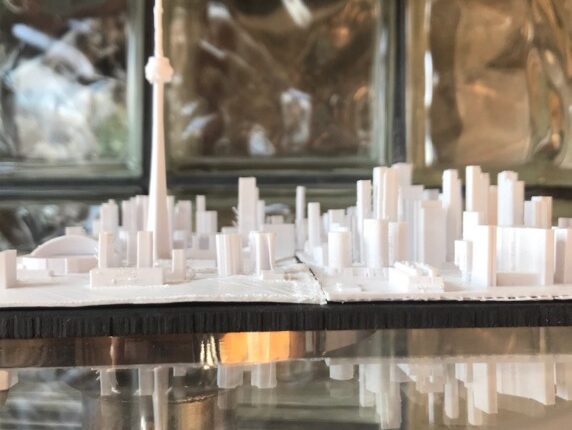
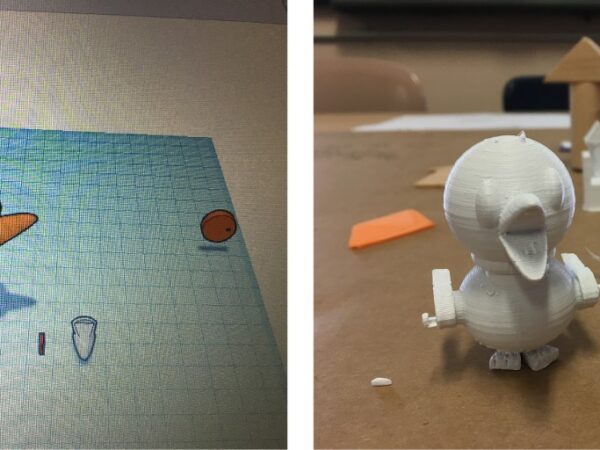
This maker was so inspired and motivated by their experiences at their school maker club that they began 3-D printing at home! The possibilities for fabricating the things AND places one loves are endless, including the unmistakable CN Tower of the Toronto skyline.
Cardboard
What makes some pieces of cardboard stronger than other pieces? Notice the fluting, those wavy middle layers (fluting) between the flat pieces of cardboard (linerboard). The size and strength of the fluting reinforces the material’s overall strength. And the more layers of cardboard, the strong the object!
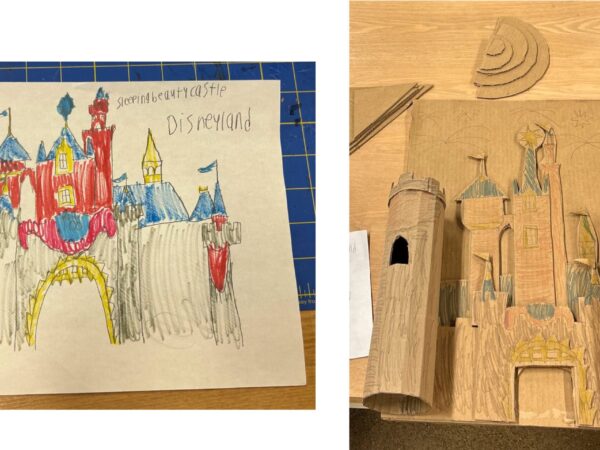
This maker’s love of Sleeping Beauty’s Castle in Disneyland was the context for employing newly acquired cardboard cutting skills. And the maker’s use of layering and including both flat and round pieces creates beautiful dimension that makes this piece stand out.
Skyscraper anyone? The scored base of this structure was a starting point for this maker’s vision. Adding circular counterbalances on opposite sides of the structure was a way to continue experimenting and iterating on an architectural idea.
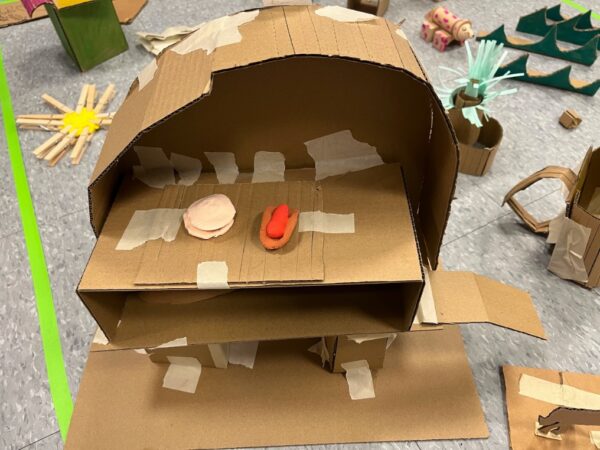
A “monster barbecue”, complete with items on the grill, was built to feed the scores of visitors that came to a magical zoo world.

This beautiful peacock, made simply by scoring a semi-circle of cardboard and gluing it against the outline of the bird, impressed us all. Seeing this creature reminded us that scoring can be used to create gentle, subtle curves.
Clay
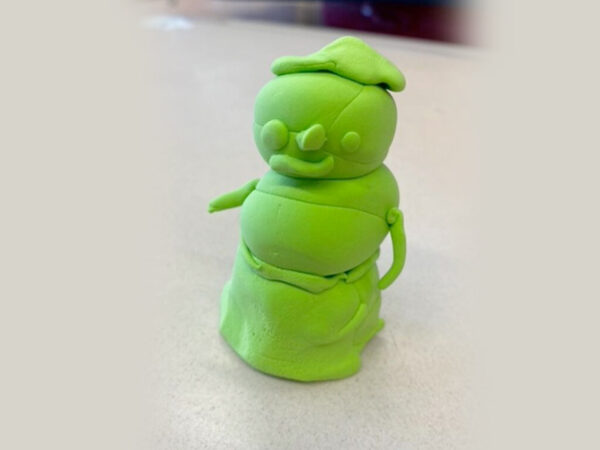
A small clay figurine exudes personality by virtue of the maker’s choices. Green clay, an atypically shaped base, and visible lines between segments result in a whimsical, potbellied snowman-like character.

The classic version of those wingless Angry Birds made a comeback as this maker’s attention to detail brought them “flinging” back to life.
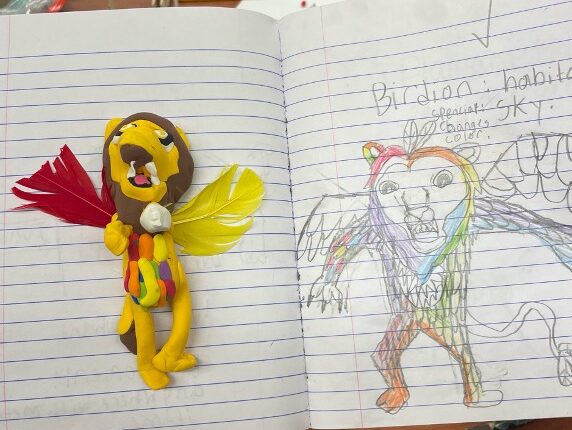
A fantastical birdion sketch gets reinterpreted as a 3D clay object.

Using multiple clay manipulation techniques–rolling, pressing, coiling–yields a wide range of shapes and objects. What world might the waving character on the left live? Perhaps in place that includes the fantastical cactus on the right.
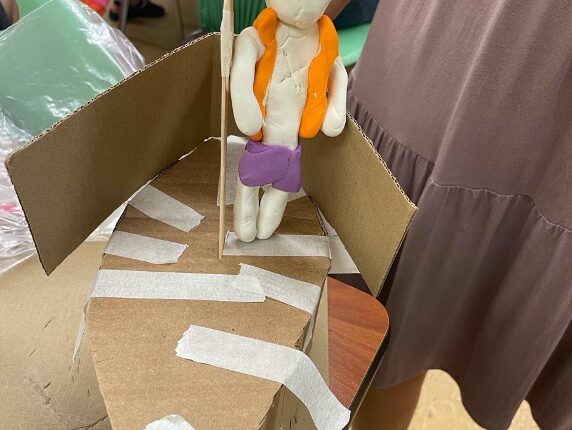
Once the sailboat was complete, it clearly needed a passenger! While clay is still moist and flexible, called the plastic state, students can have fun and go BIG, making large pieces for their worlds.
Student Journals
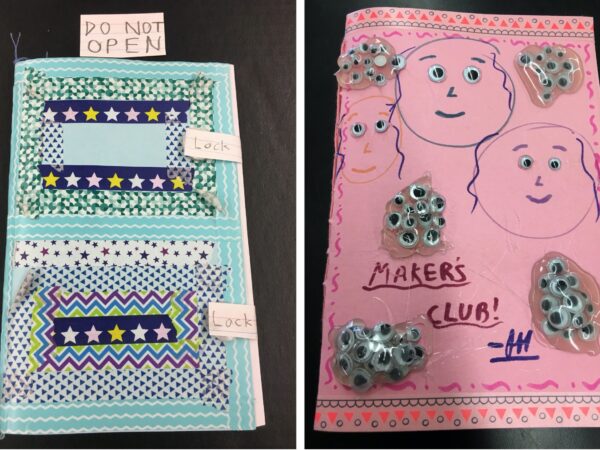
Googly eyes trapped under dried glue puddles. Security locks and warnings. What details would you include on your hand-bound journal to make it quintessentially you?
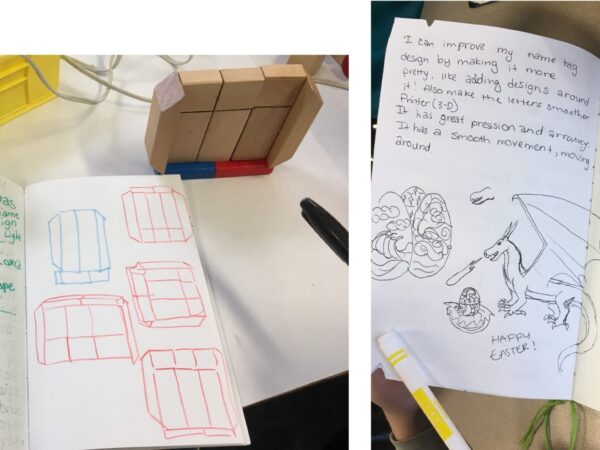
A space to reflect on what what challenging or what could be improved upon and a place to sketch and plan. The journals give every maker a place of their own.
Student journal with ideas for puzzles and other shapes.
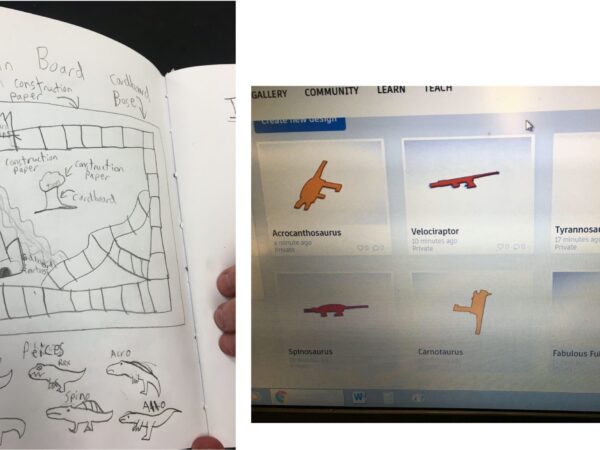
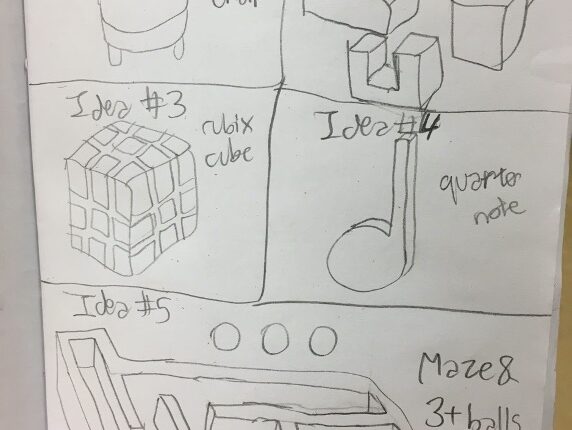
Have an idea for a game? The journals are great place to start getting ideas down on paper, noting the colors and materials to make it happen. Wondering what materials this maker was planning on using for those dinosaur playing pieces? You guessed it…playing pieces were designed in Tinkercad and printed!
Motors
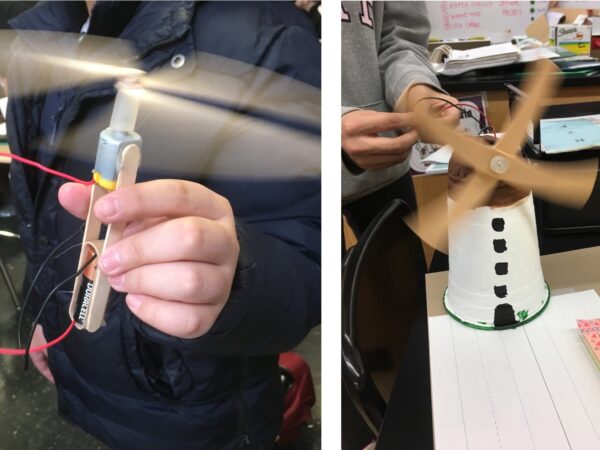
How can you NOT make propellers once you know how to make the shaft on a servo motor rotate?
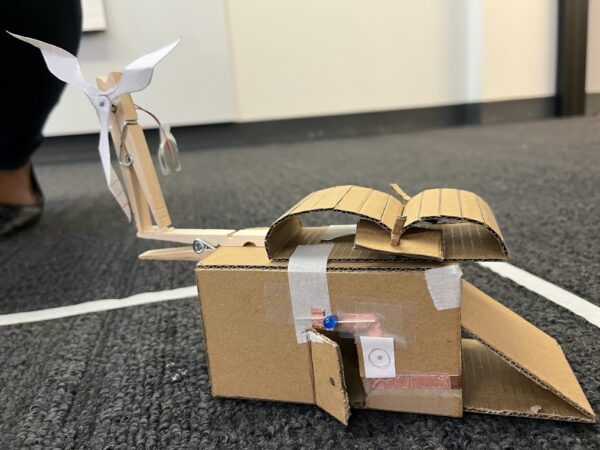
This teacher maker integrated multiple circuits in this wind-powered home. Aside from the light that goes on over the door with a “push” of the button, notice the coin cell battery hanging behind the clothespin. It’s attached with tape to a small servo motor whose rotating shaft spins the blades of the turbine.
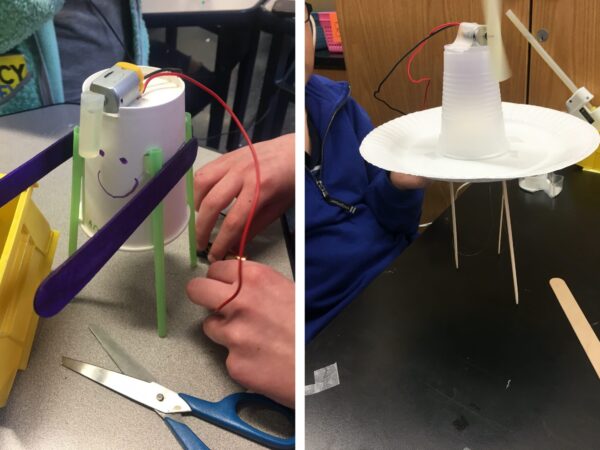
Students build creatures out of everyday materials and attach the battery and motor to it. What do you then get when you take a piece of a hot glue stick and attach it, off center, to the stem of the motor. A vibrabot! When the motor turns on and the stem rotates with an off center weight, the object wobbles and vibrates.
Paper
Paper is a fantastic making material because it is familiar, is not hard to come by, and can be endlessly manipulated with or without tools or having specific paper craft skills.
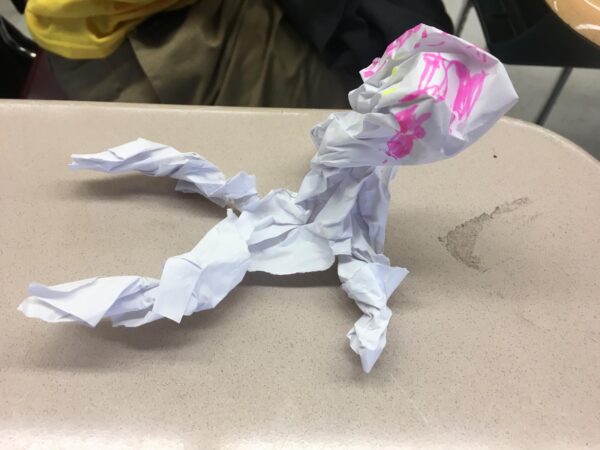
Another example of a 3D object that came as a result of the 1-sheet of paper activity, makers develop their understanding of what 3D objects are, figuring out through experimentation and conversation that 3D objects have length, width, and height.

Two playground slide forms constructed from folded paper.
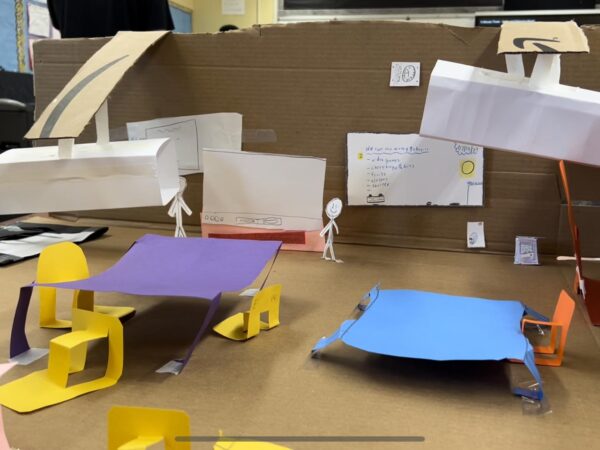
Makers took the Build a Paper Classroom activity from the World-building Curriculum, Activity 1, Part 2, to the next level!
Go inside this paper classroom (click play and you’ll see what we mean) and check out the attention paid to even the smallest entails of the room.
Kindergartners explored building with 3D shapes, adding paper to foam blocks.
Final Projects
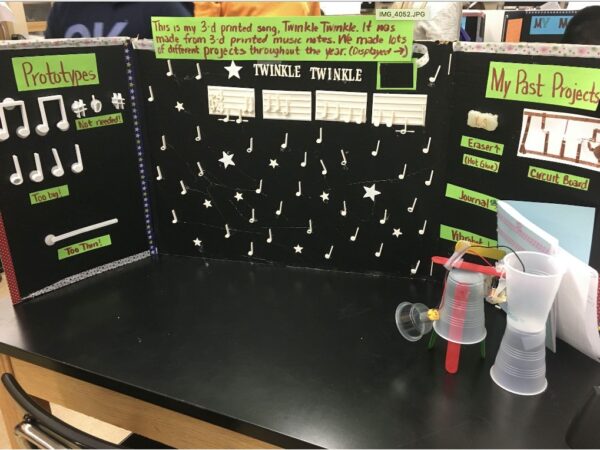
A student shares many objects from their making experience, prominently featuring the 3-D printed score of Twinkle, Twinkle Little Star, with annotated prototypes to the left. Learning is understood as an iterative process, with each attempt at executing a new skill a critical step towards one’s vision coming to fruition.
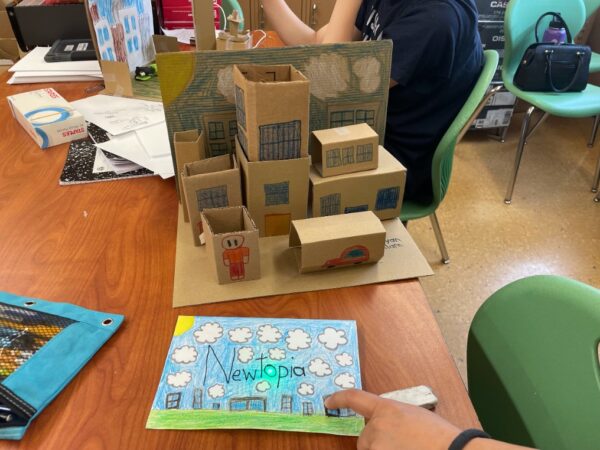
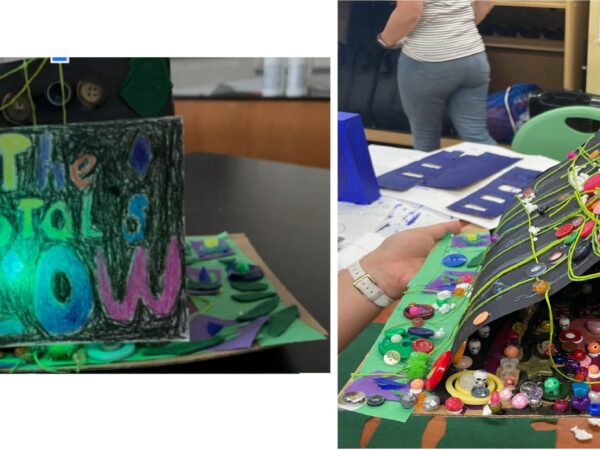
Learning how to score cardboard is a game changer for many. Not only can one make prisms of all sizes, but curving cardboard becomes an option too, allowing makers to shape a rigid material in a new way. And oh, that light up sign is pretty fabulous too! Increasing one’s materials literacy, understanding how materials and tools work, allows makers to create more complex pieces.
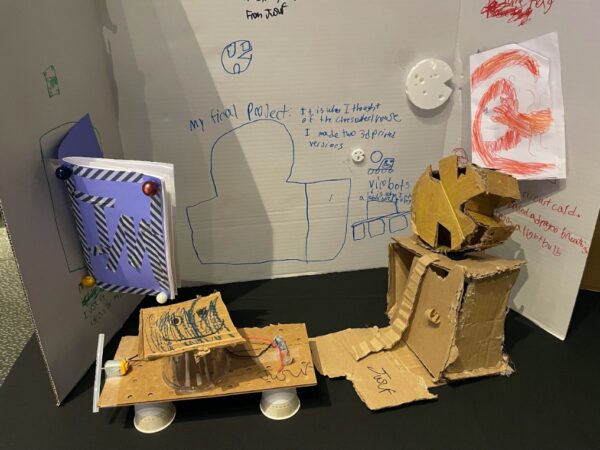
This are all representedfinal project display shows several artifacts, including a handmade journal, a light-up card with a dragon whose fire-breathing capacity is fueled by an LED, a cardboard construction of a cheese wheel house, and a drawn and 3D printed versions of the cheese wheel itself. In the foreground is a recycled-materials vibrabot, a bot whose movement comes from the shaking generated by an off-center weight (the hot glue stick) as it spins with the rotating motor shaft. Sewing, cardboard cutting, circuit making, and 3D printing through the personally meaningful creations.
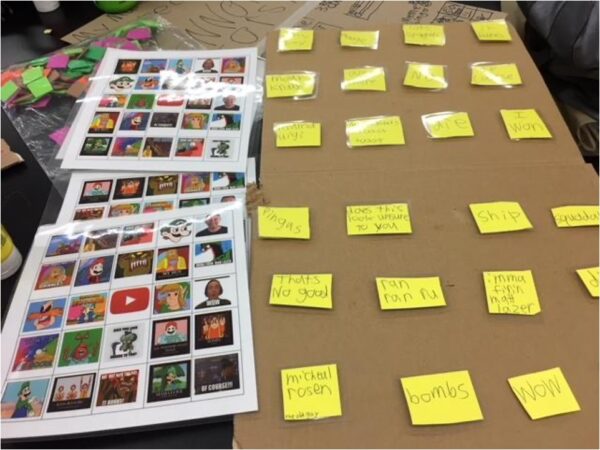
Making is a avenue for exploring and sharing one’s passions. This maker’s extensive knowledge of pop culture and memes became a bingo game, requiring special attention be paid to ensuring the right balance between the same and unique memes on each playing card. For many, succeeding in this game proved to be a real challenge!
Tee up! One maker’s love of golf translated into an 10-hole mini course. Integrating cardboard cutting and hot glue gun skills, as well as iterating through the Engineering Design Cycle multiple times for each golfing challenge, this maker delved deeply into a passion, inviting others to discover and play.
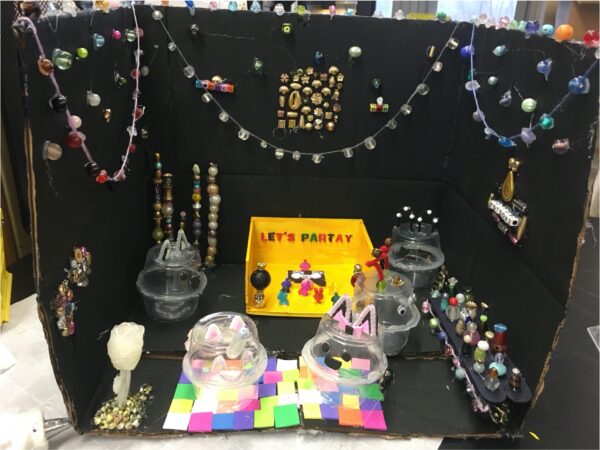
K-Pop is brought to the fore, complete with 3-D printed dancers and banner, festooned decorations, a potionz (spelling as designed!) table, and characters made from plastic cups and craft materials.
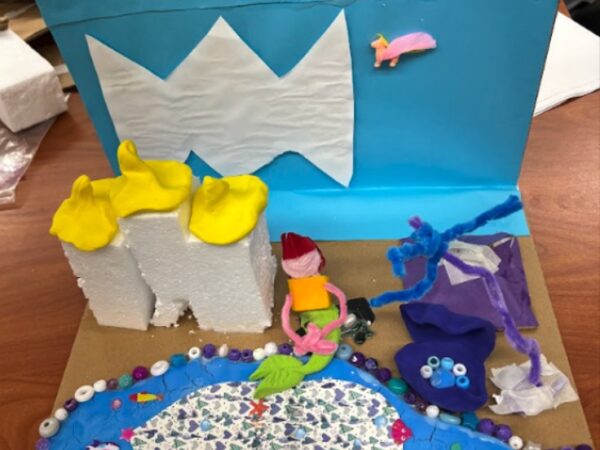
This maker relied on common craft materials, ones that many learning spaces have on hand, to make a hybrid land/water mermaid world come to fruition, complete with a treasure-holding clam and pegasus. The fine motor skills required to manipulate clay, cut foam and paper, glue beads, twist pipe cleaners, and place stickers are as significant a learning and practice opportunity as is being able to take an idea in one’s mind and then make it to share with others.
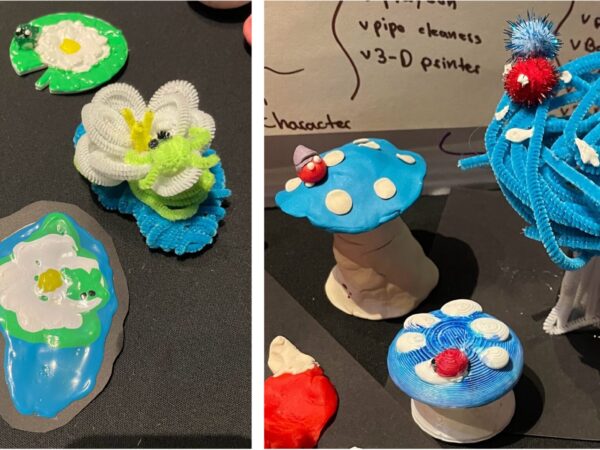
IDEAS curricula serve as guides to making activities; if you’re comfortable, riff on the activities or invent new ones! One teacher challenged makers to recreate an object out of different materials. Students develop their materials fluency as they create with air dry clay, CAD software and printing filament, or pipe cleaners. Each has their own affordances and constraints, which students discover each time they create a new version.